Download Games dan software Gratis Zulmi's Blog: Server RedHat 9 Download Games dan software Gratis
Tampilkan postingan dengan label Server RedHat 9. Tampilkan semua postingan

Minggu, 12 Desember 2010

Buat mail server pada Red Hat 9

Ketentuan

Server:

IP ADDRESS 192.168.30.1

NETMSK 255.255.255.0 (/24)

GATEWAY 192.168.30.254

Client:

IP ADDRESS 192.168.30.10

NETMASK 255.255.255.0 (/24)

GATEWAY 192.168.30.254

DNS 192.168.30.1

  1. Siapkan PC yang sudah terinstall system operasi Red Hat 9
  2. Pastikan DNS Server sudah siap digunakan
  3. Setting file resolv.conf

# vi /etc/resolv.conf

search zulmi.net

nameserver 192.168.30.1

  1. install paket postfix,squirrelmail,fetchmail

# rpm –ivh postfix-1.1.11-11.rpm

  1. karena pada saat installasi system operasi redhat 9 paket sendmail sudah terinstall maka matikan service sendmail

# service sendmail stop

  1. edit konfigurasi postfix

# vi /etc/postfix/main.cf

myhostname = server.zulmi.net è server = hostname PC

mydomain = zulmi.net

myorigin = $mydomain

inet_interface = all

mydestination = $myhostname, localhost, $mydomain

mynetwork = 192.168.30.0/24, 127.0.0.1/8

alias_maps = hash:/etc/postfix/aliases

alias_databases = hash:/etc/postfix/aliases

  1. edit konfigurasi imap

# vi /etc/xinetd.d/imap

# default: off

# description: The IMAP service allows remote users to access their mail using \

# an IMAP client such as Mutt, Pine, fetchmail, or Netscape \

# Communicator.

service imap

{

socket_type = stream

wait = no

user = root

server = /usr/sbin/imapd

log_on_success += HOST DURATION

log_on_failure += HOST

disable = no

}

  1. edit konfigurasi ipop3

# vi /etc/xinetd.d/ipop3

# default: off

# description: The POP3 service allows remote users to access their mail \

# using an POP3 client such as Netscape Communicator, mutt, \

# or fetchmail.

service pop3

{

socket_type = stream

wait = no

user = root

server = /usr/sbin/ipop3d

log_on_success += HOST DURATION

log_on_failure += HOST

disable = no

}

  1. jalankan atau restart layanan postfix,xinetd

# service postfix start

# service xinetd restart

  1. buat 2 user untuk percobaan mengirim email

# useradd –m admin

# useradd –m tkj

  1. tes postfix dengan telnet menggunakan port 25

# telnet mail.zulmi.net 25

Trying 192.168.30.1...

Connected to mail.zulmi.net.

Escape character is '^]'.

220 server.zulmi.net ESMTP Postfix

mail from: admin

250 Ok

rcpt to: tkj

250 Ok

data

354 End data with <CR><LF>.<CR><LF>

tes mail

.

250 Ok: queued as 3F58B6A6BA

quit

221 Bye

Connection closed by foreign host.

  1. tes imap dan pop3 dengan menggunakan port 110

# telnet mail.zulmi.net 110

Trying 192.168.30.1...

Connected to mail.zulmi.net.

Escape character is '^]'.

+OK POP3 ns.zulmi.net v2001.78rh server ready

user tkj

+OK User name accepted, password please

pass tkj

+OK Mailbox open, 1 messages

list

+OK Mailbox scan listing follows

1 391

.

retr 1

+OK 391 octets

Return-Path: <admin@zulmi.net>

Delivered-To: tkj@zulmi.net

Received: from ns.zulmi.net (ns.zulmi.net [192.168.30.1])

by server.zulmi.net (Postfix) with SMTP id 3F58B6A6BA

for <tkj>; Fri, 19 Nov 2010 19:05:47 -0500 (EST)

Message-Id: <20101120000547.3F58B6A6BA@server.zulmi.net>

Date: Fri, 19 Nov 2010 19:05:47 -0500 (EST)

From: admin@zulmi.net

To: undisclosed-recipients:;

Status:

tes mail

.

quit

  1. edit konfigurasi squirrelmail

# vi /etc/squirrelmail/config.php

$org_name = “ squirrelmail “;

$domain = ‘ zulmi.net’;

$imapServerAddress = ‘zulmi.net’;

$useSendmail = false;

$smtpServerAddress = ‘zulmi.net’;

  1. konfigurasi httpd.conf

NameVirtualHost 192.168.30.1

<VirtualHost 192.168.30.1>

DocumentRoot /usr/share/squirrelmail

ServerName mail.zulmi.net

</VirtualHost>

  1. restart httpd

# service httpd restart

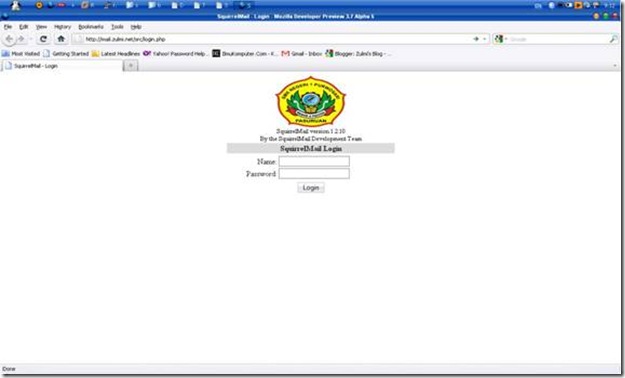
  1. tes pada browser client

clip_image002

  1. jika muncul tampilan login squirrelmail maka mail server sudah siap digunakan,untuk logo bisa di ubah pada saat konfigurasi file config.php pada squirrelmail

Buat Web Server Pada Red Hat 9

Ketentuan

Server:

IP ADDRESS 192.168.30.1

NETMSK 255.255.255.0 (/24)

GATEWAY 192.168.30.254

Client:

IP ADDRESS 192.168.30.10

NETMASK 255.255.255.0 (/24)

GATEWAY 192.168.30.254

DNS 192.168.30.1

  1. Siapkan PC yang sudah terinstall system operasi Red Hat 9
  2. Pastikan DNS Server sudah siap digunakan
  3. Setting file resolv.conf

# vi /etc/resolv.conf

search zulmi.net

nameserver 192.168.30.1

  1. install paket httpd,php4,mysql

# rpm –ivh httpd-2.0.40-21.rpm

  1. konfigurasi httpd.conf

# vi /etc/httpd/conf/httpd.conf

DirectoryIndex index.php index.html index.html.var

192.168.30.1>

DocumentRoot /var/www/html

ServerName www.zulmi.net

  1. buat file index.php pada directory /var/www/html

# vi /var/www/html/index.php

<?

phpinfo();

?>

  1. hidupkan service httpd

# service httpd start

  1. cek pada client


  1. jika muncul tampilan php info maka web server sudah bisa digunakan

Buat DHCP Server pada Red Hat 9

Ketentuan

Server:

IP ADDRESS 192.168.30.1

NETMSK 255.255.255.0 (/24)

GATEWAY 192.168.30.254

Client:

IP ADDRESS 192.168.30.10

NETMASK 255.255.255.0 (/24)

GATEWAY 192.168.30.254

DNS 192.168.30.1

  1. Siapkan PC yang sudah terinstall system operasi Red Hat 9
  2. Pastikan DNS Server sudah siap digunakan
  3. Setting file resolv.conf

# vi /etc/resolv.conf

search zulmi.net

nameserver 192.168.30.1

  1. install paket dhcp

# rpm -ivh dhcp-3.0pl1-23.i386.rpm

  1. copy file dhcpd.conf pada directory /usr/share/doc/dhcp-3.0pl1/

# cp dhcpd.conf.sample /etc/dhcpd.conf

  1. edit konfigurasi dhcp server

# vi /etc/dhcpd.conf

subnet 192.168.30.0 netmask 255.255.255.0 {

# --- default gateway

option routers 192.168.30.1;

option subnet-mask 255.255.255.0;

option domain-name "zulmi.net";

option domain-name-servers 192.168.30.1;

range dynamic-bootp 192.168.30.10 192.168.30.25;

hardware ethernet 00:0C:29:C9:D5:FD; è mac address PC server

  1. restart dhcpd

# service dhcpd restart

  1. cek pada client

Buat FTP Server pada Red Hat 9

Ketentuan

Server:

IP ADDRESS 192.168.30.1

NETMSK 255.255.255.0 (/24)

GATEWAY 192.168.30.254

Client:

IP ADDRESS 192.168.30.10

NETMASK 255.255.255.0 (/24)

GATEWAY 192.168.30.254

DNS 192.168.30.1

  1. Siapkan PC yang sudah terinstall system operasi Red Hat 9
  2. Pastikan DNS Server sudah siap digunakan
  3. Setting file resolv.conf

# vi /etc/resolv.conf

search zulmi.net

nameserver 192.168.30.1

  1. install paket vsftpd

# rpm –ivh vsftpd-1.1.3-8.i386.rpm

  1. edit konfigurasi vsftpd

# vi /etc/vsftpd/vsftpd.conf

anonymous_enable=NO

local_enable=YES

write_enable=YES

local_umask=022

chroot_local_user=YES è agar user tidak dapat mengakses root

  1. jalankan layanan ftp

# service vsftpd start

  1. cek pada client

Buat DNS Server Pada Red Hat 9

Ketentuan

Server:

IP ADDRESS 192.168.30.1

NETMSK 255.255.255.0 (/24)

GATEWAY 192.168.30.254

Client:

IP ADDRESS 192.168.30.10

NETMASK 255.255.255.0 (/24)

GATEWAY 192.168.30.254

DNS 192.168.30.1

  1. Siapkan PC dg system operasi red hat 9
  2. Install paket bind9

# rpm –ivh bind-9.2.1-16.rpm

  1. Setting file resolv.conf

# vi /etc/resolv.conf

search zulmi.net

nameserver 192.168.30.1

  1. Buat zona forward dan reverse pada file named.conf

# vi /etc/named.conf

zone “zulmi.net” IN {

type master;

file “forward”;

};

Zone30.168.192.in-addr.arpa” IN {

type master;

file “reverse”;

};

  1. Copy contoh file zona forward dan file zona reverse pada directory /var/named

# cp localhost.zone forward

# cp named.local reverse

  1. Edit file zona forward

# vi /var/named/forward

$ORIGIN zulmi.net.

@ 1D IN SOA zulmi.net. root (

1D IN NS ns.zulmi.net.

1D IN A 192.168.30.1

ns 1D IN A 192.168.30.1

www 1D IN A 192.168.30.1

ftp 1D IN A 192.168.30.1

mail 1D IN A 192.168.30.1

1D IN MX 10 mail.zulmi.net.

  1. Edit file zona reverse

# vi /var/named/reverse

@ IN SOA zulmi.net. root.zulmi.net. (

IN NS ns.zulmi.net.

1 IN PTR ns.zulmi.net.

  1. Hidupkan service named

# service named start

  1. Cek DNS server

# nslookup –sil

>zulmi.net

Server: 192.168.30.1

Address: 192.168.30.1#53

Name: zulmi.net

Address: 192.168.30.1

>192.168.30.1

Server: 192.168.30.1

Address: 192.168.30.1#53

1.30.168.192.in-addr.arpa name = ns.zulmi.net.

  1. Kalau sudah muncul tulisan seperti diatas berarti DNS server sudah bisa digunakan